HTML and CSS Part 2
1. Using an external stylesheet
We now know we can insert style rules into HTML tags, using the style="" attribute.
However, a more efficient way to accomplish this is by using an external stylesheet. Using an external stylesheet enables us to specify a set of style rules that we can then apply within our HTML tags. This tutorial shows you how to do this.
Review
You remember from previous practice, that we can insert an image into our page, like this:
</p>
To recap, the code for this is:
And we have seen that by inserting a style rule into the tag, we can manipulate the position of the image, like this:
The style rule for this is:
Now we are going to see how to wrap text alongside the image, which is a good way to place an image within a paragraph of text. Here is the above image with text wrapped to the right.
The map to the left shows the biogeography of Europe. Biogeography is the study of the distribution of species and ecosystems in geographic space and through geological time. Organisms and biological communities often vary in a regular fashion along geographic gradients of latitude, elevation, isolation and habitat area. Phytogeography is the branch of biogeography that studies the distribution of plants. Zoogeography is the branch that studies distribution of animals. Source: Wikipedia
The style rule for the above now looks like this:
As you can see, the style rule is becoming quite long and complex. This makes it more difficult to read, to detect errors, and is time-consuming to include in every image on your website that you wish to apply the style to.
So this where an external style sheet proves indispensible.
Adding external style sheets.
Setting up the style sheet and creating a rule
The first thing we need to do is set up the external stylesheet. An external stylesheet is simply a file containing the style rules you want your site to use. On a GitHub pages site, we have to create two new directories and the file, like this:
- In your site code repository add a new file: assets/css/style.scss
- Insert the following lines exactly as shown to the top of the style.scss file:

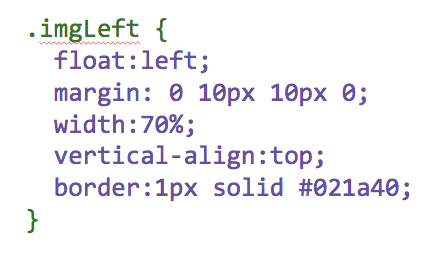
- Next, add the following code below the lines shown in the image above:

- Commit the changes to the scss file.
- Now go back to your HTML page, and change the img tag entry as follows:
<img class="imgLeft" src="https://upload.wikimedia.org/wikipedia/commons/3/39/Europe_biogeography_countries.svg" alt="image of biogeography of Europe" > - Finally, commit the changes to the file and view the result.
In the above steps, we took the style code from the image tag and created our own style rule named .imgLeft . The dot in front of the style rule name creates what is known as a style class. You can name style classes as you like, but it's best practice to use an accepted form. The form I've used here is called 'camel case' in which a capital letter is used to identify the second part of the class name (Left). This is a standard used in programming and scripting, but many developers prefer to use hypenated names (e.g. .img-left) for better readability. It's up to you. But never put spaces between your class names (e.g. .img left). This will not work.
The other important points to notice in the style code are this:
- The style rule is surrounded by curly brackets:
{ }. - Each style property is separated from its values by a colon
: - Each style property and its values end with a semi-colon
;
Study the code carefully. Code is very strict about syntax, so any mistakes in punctuation or the use of illegal characters (e.g. ") will cause errors and your page will either fail to publish or will dispaly incorrectly.
Finally, we inserted class="imgLeft" into our img tag to reference the style sheet rule. Notice that in the class declaration, we do not need to place the dot (.) before the name of the class in the HTML tag. We must use class="" instead.
Inserting the text around the image
The final thing we need to do is wrap a paragraph around our image tag and include the text we want to display next to the image. This is easy to do. In my example above, it looks like this:
<img class="imgLeft" src="https://upload.wikimedia.org/wikipedia/commons/3/39/Europe_biogeography_countries.svg" alt="image of biogeography of Europe" >
My paragraph of text goes here. After the image tag, but before the closing p tag. </p>
Notice in the above that I have put a <p> tag before the image tag, and a </p> tag after the paragraph of text.
A final tweak
Finally, in my example image in this page, I originally set the image width to 70%. But I now want the text to have equal space next to the image, so I have changed the style width to 50%, so that the image is 50% wide, which gives the text an equal (50%) space next to the image. Here is the result:
The map to the left shows the biogeography of Europe. Biogeography is the study of the distribution of species and ecosystems in geographic space and through geological time. Organisms and biological communities often vary in a regular fashion along geographic gradients of latitude, elevation, isolation and habitat area. Phytogeography is the branch of biogeography that studies the distribution of plants. Zoogeography is the branch that studies distribution of animals. Source: Wikipedia
Homework
If you haven't already created the style sheet and modified the image, please follow this tutorial and do so.
If you have already created the style sheet and formatted your image, then please modify the style rule in your style.scss file and set the image width to 50%.
Then, go to the W3Schools website and check the following tutorials on using CSS